

Table of Content
- 1.The Four-Step Approach
- Step 1: Move Your Bowling Hand and Foot at The Same Time
- Step 2: Let the Bowling Ball Fall into A Swing
- Step 3: Take the Bowling Ball to the Top of Your Backswing
- Step 4: Release and Follow Through
- 2.The Five-Step Approach
- Bowling Technique to Roll Strikes
- Step 1: Know Where to Hit
- Step 2: Focus your Aim
- Step 3: Line Up your Approach
- Step 4: Practice Your Curve
- Additional Tips
- Final Thoughts
Bowling is far more technical than it looks. You may think that it’s only a matter of rolling down the ball to hit some pins, but you are very wrong! If you want to be good at bowling, you will have to learn the basic techniques.
Bowling techniques will help you learn the best ways to roll strikes, pick up spares, curve your ball, or keep it straight. There is a simple and easy technique behind each bowling movement and style.
If you are a beginner, the numerous bowling techniques may seem confusing. In this article, we have compiled 3 basic bowling techniques that will help you bowl better. These techniques are easy to understand, but they are very important as well. Even professional players use these techniques.
We will discuss two delivery techniques: the four-step and five-step approach along with the bowling technique to roll strikes every time.
Let’s get started!
1.The Four-Step Approach
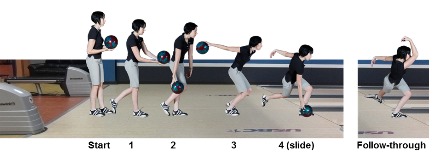
The four-step approach is one of the most common bowling techniques. As you can understand by the name, the four-step approach is a technique in which you make your roll in 4 steps.
Here is how you do it:
Step 1: Move Your Bowling Hand and Foot at The Same Time
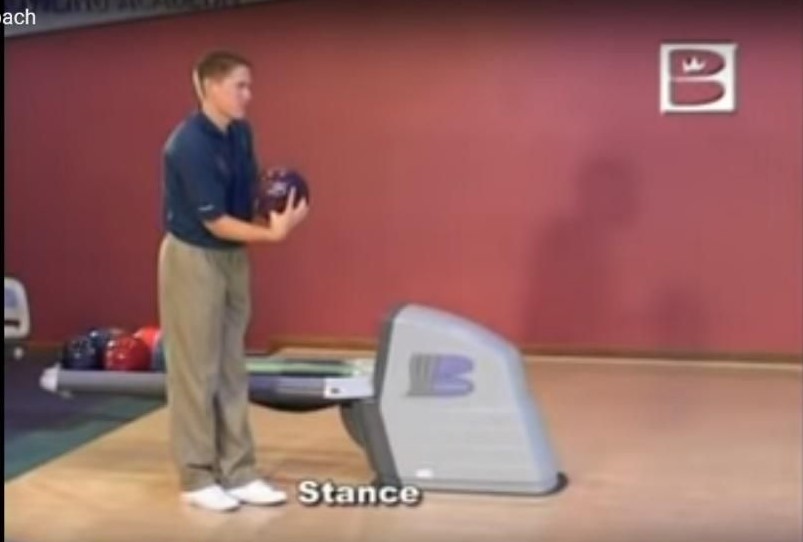
First, take your stance. You should be a few paces behind the foul line. Your feet should be firmly planted; a distance of at least one board between your feet will increase your balance. Experts suggest that the tip of your bowling shoes should be slightly pointed towards your target. You should stand in a way that your slide shoe is an inch or two ahead of your balance leg shoe.
To start your first step smoothly, bowling coaches suggest that you should put 65-70% of your weight on the foot you are not using as your first step. This means that if you are right-handed, then put the bulk of your weight on your left foot.
Additionally, when you take your stance, your body should be leaning forward slightly.
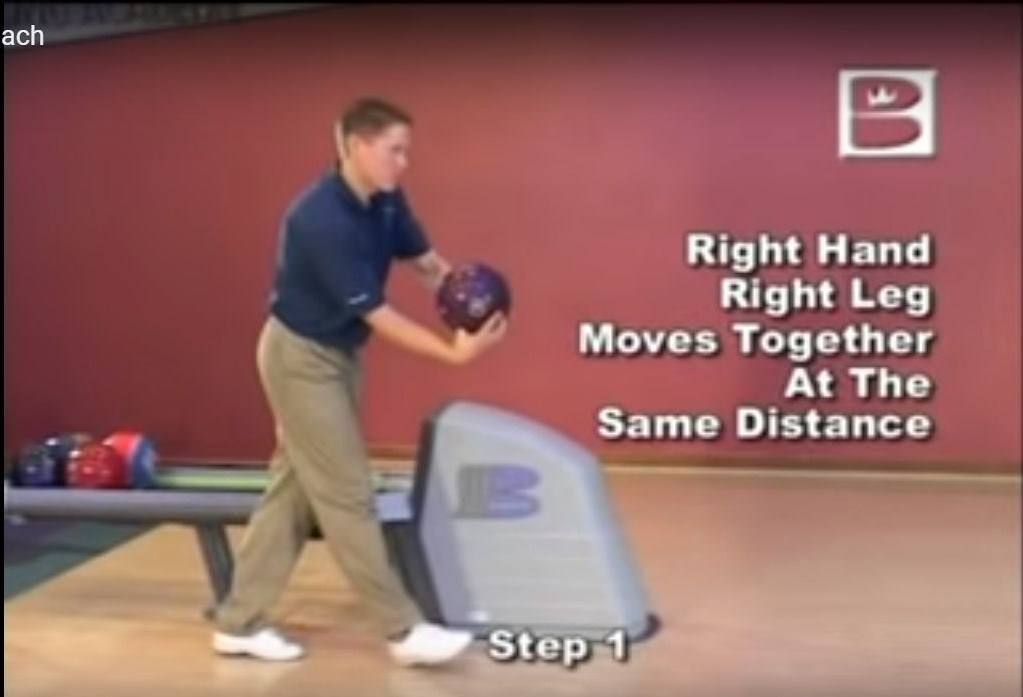
Now comes the critical part, in the four-step approach, you should always lift and move your bowling hand and the corresponding foot at the same time.
This means that if you are right-handed, then your right hand and right foot should move at the same time. On the other hand, if you are left-handed, then your left hand and left foot should move at the same time.
Another essential thing to remember is that they should both move the same distance. The hand and foot both should move forward at an equal distance. Coaches recommend that the length of the step should be equal to your normal stride. Additionally, you should take the steps at your own pace. Every person has their own pace of walking; you should practice finding the right pace for yourself. However, keep in mind that the steps should not be too fast or too slow.
The aim is to move as uniformly as possible. Finally, you should keep the ball straight; don’t move it up or down.
Look at the pictures below for easy understanding:
Step 2: Let the Bowling Ball Fall into A Swing
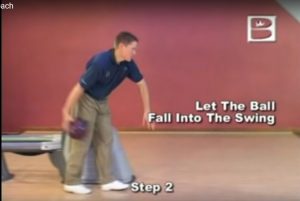
After you have taken your first step, let bowling ball fall into a swing as you take another measured step forward. If you are right-handed, then your left foot will move forward in the second step and vice versa.
At this time, your bowling ball should fall so low that it is between your left ankle and about 16 inches behind it. Remember, if you are a leftie, then the bowling ball will be between your right ankle and 16 behind it.
Your stance will change a well, you will bend at your knees so that you can drop the ball in a swing. Your opposite arm (the one not carrying the ball) should go out for balance at the same time that you bring the ball down.
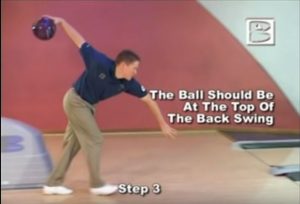
Step 3: Take the Bowling Ball to the Top of Your Backswing
Once you drop your bowling back, swing your hand towards the back to give your bowling ball momentum while you move forward. The third step should be shorter than steps 1 and 2 because, in the final step, you will have to slide your foot.
Step 4: Release and Follow Through
In the final step, the left leg slides forward at the same time you swing your bowling ball forward to release. From the third step, the ball will come down from the top of your backswing just as your left foot slides forward. At the same time, your ball-side leg will move back, and the foot should roll on its side.
Your slide should glide and carry forward with the momentum you have built in the previous three steps. It should be smooth and consistent. You should release your ball when it’s just at the edge of your right ankle. It will look something like this:
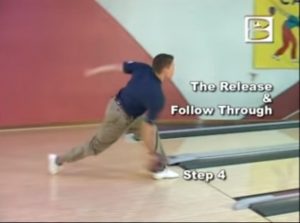
After you have released the ball, follow through by bringing your elbow above the shoulder. This will help you keep your balance, straighten up to see your ball hit the target.
The four-step approach is simple and easy to follow. It can give you consistent ball rolls and high average scores. We recommend that you practice your approach regularly to become better at it.
Let’s take a look at all the step together:
2.The Five-Step Approach
The Five-step approach is a variation of the four-step approach. One additional step often called the trigger step, is added to the beginning of the four-step approach. In this additional step, the ball does not move. You take this step just to gain momentum before you slide into the first step. Some players find that the additional step gives them a smoother and more fluid movement then the four-step approach.
The first step is a lot smaller than the other steps. Some experts recommend going 12 inches forward in your first step. What you do is, you hold your ball and move forward so that you have some extra time to move your ball.
After you have taken the first step, then the rest of the four steps are exactly like the four-step approach.
Let’s take a look at both the 4-step and 5-step approach to see the difference:
Bowling Technique to Roll Strikes
Let’s be honest, we always imagine ourselves rolling perfect strikes on every turn. However, the reality is quite different; we don’t roll strikes at every turn. In fact, we are jubilant if we manage to roll one strike per game.
But why are you limiting yourself? With this technique, you too can roll a strike 9/10 times.
Let’s see what you will have to do:
Step 1: Know Where to Hit
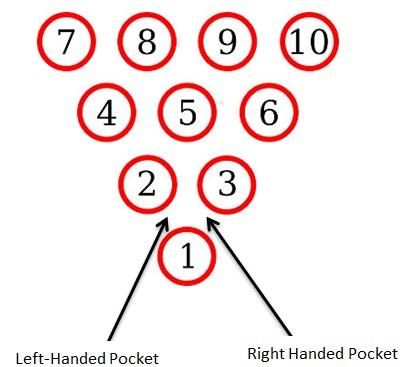
To roll a strike, you have to hit the pins in a place where they are sure to topple each other. Don’t worry, you won’t have to find this perfect position. Professionals have already discovered this premium pin position; it’s called the ‘pocket.’ The pocket is the space between pin 1 and pin 2 or pin 1 and pin 3. Here is a diagram to help you understand:
If you hit the ‘pocket’ then the angle will be such that all pins will fall without fail. If you are a right-handed bowler, then you should aim for the pocket between pin 1 and 3. On the other hand, if you are a leftie, then target the pocket between pin 1 and 2.
Step 2: Focus your Aim
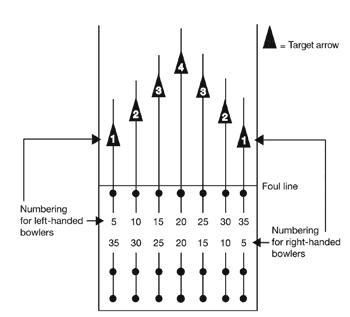
Most beginners believe that they should keep their focus on the pins. Yes, the pins are your target, but your focus should be on the arrows on the bowling lane. If you are a right-handed Kegler and you want to roll a strike, focus on the second arrow from the right on the middle lane. Similarly, left-handed bowlers should focus on the second arrow from the left on the middle lane.
Choosing to focus on the arrows or dot on the bowling lane is called spot bowling, whereas focusing on the pins is called pin bowling. Bowling experts prefer sports bowling over pin bowling because it is easier to target the arrows then the pins. Think of it yourself, the arrows are much closer to the player then the pins. You will have better luck focusing on something which is closer to you rather than something that’s far off.
Hence, if you target a specific arrow that you know will help you roll a strike, then you will have a better chance at rolling a strike consistently.
Step 3: Line Up your Approach
The outcome of your roll is determined to the right when you start your approach. A correct approach will always translate into a good score. You can use a 4-step or 5-step approach, its entirely up to you and your style of bowling. However, remember to align your approach with your aim.
Before the foul line, you will see three parallel rows of dots. Use these dots to guide your approach. I’ll tell you what works for me; I am right-handed with a slight hook, so I place my left foot just to the right of the middle dot when I release the bowling ball. Following this principle, if you are a leftie, you can place your right foot just to the left of the center dot.
This approach allows me to get the arrow I am targeting and hit the pocket perfectly. If this approach is not working for you, then you should move a little to the left or right to get the approach that is perfect for you. You should aim for the same arrow but your approach a little to the right or little to the left, deepening on your hand preference.
Step 4: Practice Your Curve
Beginners usually roll a straight ball because they are not familiar with the concept of hooking or curving the ball. The pocket is located at an angle, so a curveball is more likely to hit it than a straight ball, so practice throwing a curveball every chance you get!
Additional Tips
A bowling technique will only work if you know how to hold the ball correctly. The first you have to decide is whether to hold the ball using the conventional grip or the fingertip grip. In a conventional grip, you insert your fingers into the finger holes, up to the second digit.
Whereas in the fingertip grip, you only insert your fingers up till the first digit. With the fingertip grip, you can get a high rev rate (more revolutions of the ball). A high rev rate will help you with the speed, accuracy, and curve of the ball.
Typically, the fingertip grip increases your chances of scoring a strike. If you can’t use the fingertip grip, then you can still hit a strike, you will just have to work a little harder.
Once you have decided on the grip, you should know how to insert your fingers into the bowling ball. Most beginners insert all fingers and thumb at the same time. You should avoid this; first, insert your thumb and then your fingers to get a good grip on the ball.
Final Thoughts
Bowling is an exciting and fun game; if you learn the proper techniques, then you will definitely start having more fun! These basic techniques are easy to learn, and they will be useful forever.
The correct approach, delivery methods, and focusing tips will help you score a higher score consistently.
I have to warn you though, nothing comes without practice. If you want to become a good bowler, practice your craft regularly, and you will be hitting turkeys soon!